Friday, December 11, 2015

Funky Vintage desk/vanity makeover

I am excited about today's post. Another decoupage vanity/desk. One Sunday morning on my way to church, passing through some streets there was a huge garage sale. The stuff they had out on the yard caught my eyes.

My one son in the back goes Mommy are you going to stop at that yard sale?

Me: Hmm, Well, honey I think I am since we are early heading to church. So I made a u turn back to the huge yard sale. This person had so many vintage antique furniture. I kept going back and forth to which furniture piece to go after?  Had no choice but to get only 1 thing and make it quick.

So, I scored this beautiful antique desk.

It sat in the garage for about a whole week. Trying to decide what to do with it.

The day came and I decided how to work on it. Cleaned it up didn't bother to sand the bottom since I am painting it. First, had to work on the bottom leg had an extra piece was broken. I sanded used bondo to even it out. Hubby took a piece of wood and carved it to match with the other bottom pieces. Wood glued it and waited till it completely dried..
I completely forgot to take a picture of  it after I glued the bottom piece..

Once, it dried I spray painted the legs gold. For the bottom I wanted the color to be very light blue/grey. Saved me a trip to home depot. I mixed in 3 colors  that I already had to get the color I wanted!

Perfect! Primed twice and painted the body 3 coats.

 Next, was to flip it over and start working on the top I started to sand it and realized that it's not real wood! So, now I couldn't stain the top. Had no choice but to prime and paint it all the same color...

I painted the 3 upper drawers and then used a gold pen to trim around. The bottom 4 drawers got decoupage paper.  Last, sealed the whole desk with Polyacrilic 3 times.

So, here is my Funky Vintage decoupage desk/vanity


Thank you for stopping by!
Marianthi

Friday, December 4, 2015

Vintage Decoupage Desk Makeover

Hi all,

I saw this desk on craigslist and knew I had to have it! The person I bought it from said he had this desk for year's. He told me that it was made in 1930s-1940s.

To be honest this desk surprised me as I brought it home! The drawers are very sturdy and different.

It has dividers inside and a hook in the back end so it can lock. Sadly, I have no key to unlock it but it's still a unique desk.  


Well, I cleaned out this desk lightly sanded it with 180 grits. I knew this desk was perfect to decoupage in vintage style.

 Trying to decide which paper to go with for the drawers.  Ended up with the lighter paper...

Spray painted the knobs...

 Once, done I painted the body antique white and top java gel stain. At the end it came out pretty sweet!


 Must admit I'm loving to decoupage lately!!

Thanks for stopping by.
Maria

Thursday, November 19, 2015

EXQUISITE MAHOGANY DESK

Hello people!!

Today's post is about a Mahogany desk I did. This desk was in excellent condition.

When I brought it home I went ahead and cleaned it up. My plan was to stain the whole desk.
                                                         Here is the desk before . Plain boring??


I knew this desk will take me a good whole week to work on it.  Slowly sanded down to it's bare grain. It took me 5 tiring days to sand it down.
                                                                       Day 2
                                                                   Day 4


On the next day, my crazy wild mind decided not to stain it after all the sanding I did. Decided to do something different. Paint it to be an Eclectic and glam style.  So, I cleaned up the desk to make sure there was no dust on it and did 2 coats of primer that day.

 It sat for 2 days without being touched after it was primed..

Rich blue body paint...
When I started working on the top I had a major disaster.
The whole left side and leg was spilled with another color paint. Right away I cleaned it up with damp rug and was able to take off the other color off..  But as for the floors ugh took forever to clean up!!

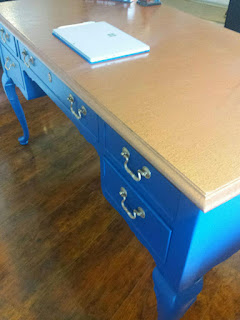
Are you ready to see this amazing transformed desk?  Here it is Hammered copper top paint, with rich blue body and gold mate  hardware finish!!
                                                               Rich blue body


                                                   Copper finish on top with a glossy feel


                                                                Gold Finish hardware
 What do you all think??
In person it looks so glamour and exotic

Thanks for stopping by
Maria

Sunday, November 8, 2015

DIY Upholstered Headboard..

Hi all! Hope you are doing great!

I am finally getting over to my bedroom  that was done months ago. My bedroom was just plain old, boring and ugly.  To  purchase a new bedroom set now was not in my list due having little ones on board. So, why not paint my furniture pieces??

I painted my dressers Grey. Then came across my 9 feet long cream headboard!

Paint or Upholstery?


Picture below is before..I know you can't see the night stands due to the crib being there.

Why not upholster it?

 The head board  was hideous and very hard.  Off to a Fabric store. I  Bought the foam batting and 3 and half yards of fabric. To be honest, I was a little scared to upholster something so BIG! Never done anything bigger than a cushion seat.
   

Next day got to work with it. I sprayed the foam on the head board.
Picture below spray adhesive and foam. I bought( 2) 1 inch foam. The headboard was in different layers. Bottom part got 2 inch layer and the top thin part got only 1 inch foam. Had to even it out..
 Last, was the fabric thank God for my mother in law  came  in just in time to help rescue me with the fabric. As I mention before it's 9 feet long. You do need 2 people on this 3.5 yards of fabric. Together we laid the fabric down and made sure it was straight before we started to staple it.  I am so thrilled of the outcome. It's very plush and comfy head board.  My whole bedroom furniture makeover costed me $130.00. The foam and the batting were the most expensive items.


Gotta say it was easy to do..


Maria

Wednesday, October 28, 2015

Campaign 3 drawer dresser..

Hi Friends!

Today's post is a campaign dresser I got. This is the 1st item I ever purchased from a Thirft store. Brought in excellent condition just needed clean up and paint.
 I did not even bother to sand it down. I just went right along with 2 coats of primer. Once done , I painted 4 coats of high gloss blue paint and then I cleaned up the hardware and boom it was done. I love that this item can be used as a dresser or even a nightstand. 

                                                            Bringing  Old to New LIfe!!!

                                                                      SOLD
Thanks for stopping by