Monday, February 15, 2016

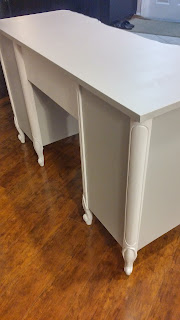
French Provincial desk before and after

So, this  little desk was found by my Mother. She called me and said I bought a desk for you from someone in her community was moving  and selling furniture. The very next day I picked it up from her house ( I was impressed that she picked up a cute little French style desk) and brought it home. After, looking at the desk I knew this desk was going to be a pain. Stickers on top and 2 or 3 different coats of white paint slap on body of desk.


First, I started on top to remove all the stickers carefully. The big stickers were not so bad to get off but the little ones were a pain. Using Goof off and Mineral spirit to get stickers off.  Now the body part. I tried to smooth the paint out but It didn't work much. Here is a picture I took while I was already adding strip gel to it. Hard to see on picture. 

 Left it overnight for the gel to kick in. Next day peeled all the paint off sanded and cleaned it up. Painted color is between silver/light grey color with gold accents. After, several hours of labor it came out gorgeous. 


                                                        ( Sold) Thank you Denise!

Thanks for stopping by.
Have a blessed day

Monday, February 8, 2016

Antique Decoupage Desk Makeover

I transformed this plain boring antique desk into a beautiful contemporary piece. When, I brought this desk home it was in good condition. After, it sat in the garage for a few days, finally I decided how I wanted this desk to be done.

Cleaned it and didn't bother to sand it. It was smooth like new.

Just so you know this desk was done awhile back about 2 or 3 weeks before Christmas. My lovely husband surprised me with an early Christmas gift. He got me a Wagner spray gun! So, he wanted to see how it works on this desk. As you can see it got it's first coat of primer on.
Before testing it on desk we practiced on huge cardboard to understand how it works and adjust it. After 2 coats of primer next was to be painted black and last was the sealer. Thanks to my husband for painting this desk for me.
While my husband was spray painting, I started working on the drawers. I bought this cute paper stock to decoupage the drawers.  Here are the drawers using 2 different types of stock paper

Gave them a nice few coats of sealer. Next, Spray painted the original knobs black.


Thanks for stopping by!

Saturday, January 30, 2016

Navy and White dresser makeover


Finally, gave a dresser a makeover!!

This dresser was my mother-in-law's and now handed down to my 2 little ones. I decided to first give the dresser a makeover before painting the room.  It was in good shape except for some of the drawers. As you see in picture below it got worn out by the knobs.
So, I went and started sanding down the drawers only with 80 grits , 120 grits and last 220 grits.

 For the body part I just went straight to cleaning it up, primed it twice and painted it white satin. For the drawers I primed twice and painted in navy blue.-  
 For the middle drawers got decoupage. Last sealed and added the same knobs on . 
Love the new life I gave it!


Happy how it came out! Now time to paint the room and decorate it!
Thanks for stopping by
Have a blessed day!
Maria

Sunday, January 17, 2016

French Provincial desk makeover


Hi all! Sorry, I haven't been on lately due to my computer crash. My wonderful husband was able to fix it and give me a brand new 24" screen to connect it to. Trust me, me and electronics do not go together. For some reason I am horrible with computers. They seem to always shut down on me or end up with a virus. Anyways, today's post is about this cute creamy yellow French style desk I got. I had a customer that wanted a French provincial desk.

 After I got the desk all cleaned up and lightly sanded the top, primed it twice and next was to figure out how to paint it. Looking at all the paints I had I had to come up to mix that would work.

 I painted most parts of the body white. Top, drawers and sides were silver/grey along with some gold trim and hardware finish. Last, I sealed it and came out gorgeous classy desk! I absolutely loved it! It feels good to see my customers happy and satisfied with my work! This is the primary reason that I am doing this since financially does not really make sense given the time I put in these pieces


Excuse the lack of  staging on this desk!

Thanks for stopping by!

Friday, January 1, 2016

Elegant Queen of Anne Desk/Vanity makeover

Happy New Years to all!!

Hope you all had wonderful holidays! I know I did for sure.
Well today's post is about a desk transformation! I am finally able to get around and write about this vanity I did a little over 2 months ago. Desk was in excellent state. Queen of Anne desk along with a nice bench!  
                                                        She was just to plain and boring


I slightly sanded it, primed it twice and painted in white satin. Then added gold feet and trim around! Can you tell I am obsessed with gold feet!!!! LOL
Last, I worked on the bench.
I repeated the steps as I did on the desk then off looking for a nice fabric for it!
Which I found!

Are you ready to see this Queen of Anne Desk/Vanity......
Here she is..............................


 This beautiful desk can be used as a writing desk, vanity or even a foyer table..

What you think?
Thanks for stopping by!

Have a blessed 2016 everyone!!
Marianthi

Friday, December 11, 2015

Funky Vintage desk/vanity makeover

I am excited about today's post. Another decoupage vanity/desk. One Sunday morning on my way to church, passing through some streets there was a huge garage sale. The stuff they had out on the yard caught my eyes.

My one son in the back goes Mommy are you going to stop at that yard sale?

Me: Hmm, Well, honey I think I am since we are early heading to church. So I made a u turn back to the huge yard sale. This person had so many vintage antique furniture. I kept going back and forth to which furniture piece to go after?  Had no choice but to get only 1 thing and make it quick.

So, I scored this beautiful antique desk.

It sat in the garage for about a whole week. Trying to decide what to do with it.

The day came and I decided how to work on it. Cleaned it up didn't bother to sand the bottom since I am painting it. First, had to work on the bottom leg had an extra piece was broken. I sanded used bondo to even it out. Hubby took a piece of wood and carved it to match with the other bottom pieces. Wood glued it and waited till it completely dried..
I completely forgot to take a picture of  it after I glued the bottom piece..

Once, it dried I spray painted the legs gold. For the bottom I wanted the color to be very light blue/grey. Saved me a trip to home depot. I mixed in 3 colors  that I already had to get the color I wanted!

Perfect! Primed twice and painted the body 3 coats.

 Next, was to flip it over and start working on the top I started to sand it and realized that it's not real wood! So, now I couldn't stain the top. Had no choice but to prime and paint it all the same color...

I painted the 3 upper drawers and then used a gold pen to trim around. The bottom 4 drawers got decoupage paper.  Last, sealed the whole desk with Polyacrilic 3 times.

So, here is my Funky Vintage decoupage desk/vanity


Thank you for stopping by!
Marianthi